How to Design a Certificate Cover: Step-by-Step Guide

TL;DR:
- A certificate cover is a protective, decorative folder that presents formal documents like diplomas and awards, symbolizing achievement. Designing one involves selecting materials, branding, imprint methods, and precise sizing to ensure durability, elegance, and proper document fit. Using simple designs, vector artwork, appropriate imprint techniques, and padding enhances perceived value and long-term protection of certificates.
A certificate cover is a protective and decorative presentation folder that houses formal documents such as diplomas, awards, and professional credentials, transforming a printed page into a lasting symbol of achievement. Knowing how to design a certificate cover requires decisions across four interconnected areas: material selection, branding and typography, imprint method, and document fit. Whether you represent a university registrar’s office, a corporate HR department, or a nonprofit honoring volunteers, the cover you choose communicates the weight of the recognition inside it. This guide walks through each design decision with the specificity and precision that professional presentation demands, drawing on established customization principles and the expertise behind certificate cover design.
How to design a certificate cover: materials and sizing
The foundation of any well-designed certificate cover is the material it is made from and the dimensions it is cut to. These two choices determine durability, aesthetics, and how well the cover protects the document over time.
Common cover materials and their characteristics
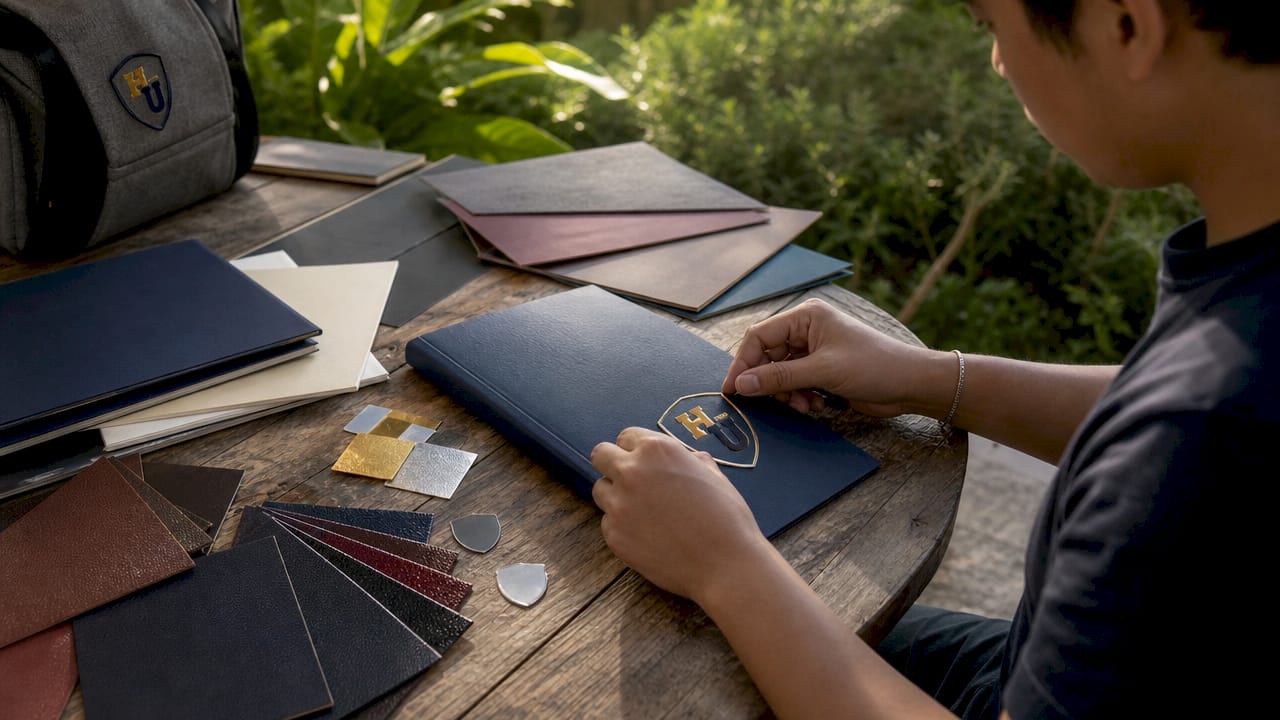
- Leatherette: A synthetic leather with a textured grain finish. It conveys prestige and is the most popular choice for graduation diplomas and professional certifications. Leatherette resists minor moisture and holds its shape through repeated handling.
- Fabric: Woven cloth covers, often in linen or buckram, carry a traditional, academic feel. They accept foil stamping well and are frequently used by universities and religious institutions.
- Vinyl: A cost-effective, smooth-surface material suited for high-volume orders. Vinyl is durable and available in a wide color range, making it practical for corporate training programs and government agencies.
- Padded covers: Any of the above materials can be produced with foam padding beneath the outer layer. Padded certificate covers protect documents 95% better than simple paper folders. That figure reflects the reduction in bends, creases, and corner damage during transport and storage.
Standard certificate sizes and why measurement matters
| Document Type | Common Size | Recommended Cover Size |
|---|---|---|
| Standard certificate | 8.5 x 11 in | 8.625 x 11.125 in |
| Small award certificate | 6 x 8 in | 6.125 x 8.125 in |
| Large diploma | 11 x 14 in | 11.125 x 14.125 in |
| Non-standard / custom | Variable | Measure + add 1/8 to 1/4 in |
Covers sized 1/8 to 1/4 inch larger than the certificate prevent edge tearing and allow the document to lay flat without buckling. This clearance is the single most overlooked specification in bulk ordering, and it is the difference between a cover that looks polished and one that warps within weeks.
Pro Tip: Measure your actual printed certificate, not the paper stock size listed in your printer settings. Printed certificates often have borders or bleeds that shift the true document dimensions by as much as a quarter inch.
Orientation is equally consequential. Portrait-oriented certificates use a tent-style cover that opens upward, while landscape-oriented documents use a book-style cover that opens to the side. Matching orientation to the certificate layout is not a stylistic preference. It is a functional requirement that determines whether the document sits correctly inside the cover.
How to incorporate branding and design elements effectively
Branding transforms a generic cover into an institutional statement. The goal is a design that reflects the issuing organization’s identity without overwhelming the cover’s clean, formal character.
Logo and artwork preparation
High-resolution vector artwork is non-negotiable for sharp logos and text in any imprinting process. Vector files in formats such as .AI, .EPS, or .PDF scale to any size without losing edge definition, which matters enormously when a logo is reduced to fit a 2-inch imprint area on a cover. Raster images like JPEGs or PNGs blur and produce jagged edges at print resolution, resulting in an imprint that looks unprofessional regardless of how good the original design was.
Color palette and typography
- Color selection: Choose one or two brand colors for the cover itself and one metallic foil color for the imprint. Gold foil on navy leatherette, silver foil on burgundy fabric, and black foil on cream vinyl are classic combinations that read as authoritative and traditional. Avoid more than two cover colors, as additional tones add cost and visual noise.
- Typography hierarchy: Use a serif font such as Garamond or Times New Roman for the institution name and a clean sans-serif such as Helvetica or Gill Sans for secondary text like the year or program name. Limit the design to two typefaces. More than two creates visual competition that undermines the cover’s gravitas.
- Font sizing: The institution name should be the largest text element, typically set at 18 to 24 points for a standard 8.5 x 11 cover. Taglines or program names should sit at 10 to 14 points. Text smaller than 8 points will not reproduce cleanly in foil stamping or embossing.
Layout principles and common mistakes to avoid
White space is not wasted space. A certificate cover with generous margins and a centered logo reads as confident and refined. Crowding the design with multiple text blocks, decorative borders, and a large logo simultaneously produces a cover that looks busy rather than prestigious.
- Place the primary logo or seal in the center or upper center of the cover panel
- Limit decorative borders to a single thin rule or a subtle corner motif
- Avoid using more than three design elements total on the front panel
- Do not use drop shadows or gradient fills, as these effects do not translate to foil stamping or embossing
Security and verification elements such as embossed seals, QR codes, or certificate ID numbers add credibility without requiring elaborate design work. QR codes and certificate IDs enhance verification and add a layer of institutional credibility that recipients and third parties recognize immediately. Position these elements discreetly in a lower corner so they do not compete with the primary branding.
Pro Tip: Request a physical proof from your printing vendor before approving a bulk run. Digital mockups do not accurately represent how foil colors interact with cover materials under different lighting conditions.
What imprinting methods enhance certificate cover presentation?
The imprint method is the single design decision with the greatest impact on perceived quality and cost. Each technique produces a distinct aesthetic and suits different organizational identities.
Foil stamping vs. embossing vs. debossing
| Method | Visual Effect | Best For | Limitation |
|---|---|---|---|
| Foil stamping | Metallic shine in gold, silver, or custom colors | Traditional institutions, graduation covers | Fine lines and tiny text may not reproduce cleanly |
| Embossing | Raised design with no color, tactile texture | Modern, minimalist brands | Requires a custom die; adds setup cost |
| Debossing | Indented design pressed into the cover surface | Contemporary corporate programs | Less visible from a distance than foil |
| Combination | Foil applied over an embossed area | Premium, heirloom-quality covers | Highest cost; longest production time |
Foil stamping adds a historic and prestigious shine, while debossing creates a minimalist elegance favored by modern brands. These are not interchangeable aesthetics. A university with a 150-year history and a gothic seal will almost always choose gold foil stamping. A technology company issuing professional development certificates will more likely choose silver debossing on a matte black vinyl cover.
Adding metallic foil stamping increases the perceived value of certificate covers by up to 40%. That increase in perceived value directly affects how recipients regard the achievement the cover represents, which is the entire purpose of investing in a quality presentation product.
Design considerations for imprinting quality
Simpler, bold logos produce sharper imprints than intricate designs. Fine lines thinner than 0.5 points and text smaller than 8 points routinely fail in foil stamping and embossing, producing blurred or incomplete impressions. The solution is to simplify the artwork before submission. A logo that works beautifully on a website at 300 pixels wide may need to be redrawn with heavier strokes and reduced detail for a clean foil imprint at 2 inches wide.
Pro Tip: Ask your vendor for a minimum line weight specification before finalizing your artwork. Most foil stamping processes require a minimum stroke weight of 0.5 to 1 point. Designing to that specification from the start eliminates costly revision rounds.
Imprinting method also affects turnaround time and unit cost. Foil stamping from an existing die is fast and cost-effective at volume. Creating a new embossing die adds both time and a one-time tooling fee, typically ranging from $50 to $150 depending on design complexity. Factor these costs into your budget before committing to a method.
How to finalize size, orientation, and practical features to protect certificates
A well-designed cover that does not fit the document correctly fails at its primary function. Practical features and precise sizing are as important as the visual design.
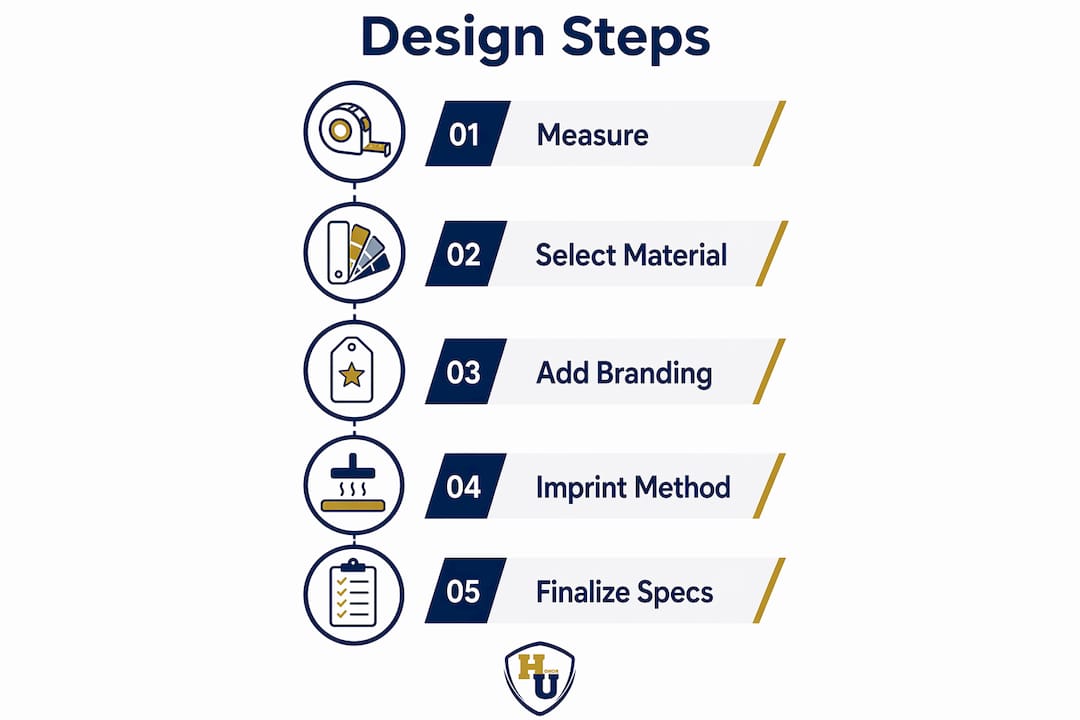
Step-by-step process for finalizing cover specifications
- Measure the printed certificate accurately. Use a ruler or calipers to measure the actual printed document, not the paper size. Record both width and height in inches to two decimal places.
- Add the recommended clearance. Add 1/8 to 1/4 inch to both dimensions. This clearance prevents the certificate from catching on the cover edges and allows the document to be inserted and removed without damage.
- Determine orientation. If the certificate reads in portrait format (taller than wide), select a tent-style cover. If it reads in landscape format (wider than tall), select a book-style cover. Portrait covers open upward like a tent; landscape covers open to the side like a book.
- Select internal features. Satin ribbon corners hold the certificate in place without adhesive, preventing slippage during presentation. Foam padding beneath the cover material absorbs impact and prevents the document from creasing during shipping or handling.
- Choose cover thickness and board weight. Heavier board weight (typically 80 to 100 point chipboard) produces a cover that feels substantial in the hand and maintains its shape through repeated use. Lighter board is acceptable for single-event covers but will not hold up to long-term display.
- Confirm specifications before bulk ordering. Order a single sample unit with your exact specifications before committing to a large quantity. Verify that the certificate fits correctly, the imprint is sharp, and the cover opens and closes smoothly.
Padded covers protect documents from bends and dings, which is particularly relevant for certificates that will be mailed, shipped in bulk, or stored before a ceremony. The foam layer distributes pressure evenly across the document surface, preventing the localized stress that causes creasing at corners and edges.
Pro Tip: For bulk orders destined for mailing, specify foam-padded covers and request that your vendor pack them flat rather than stacked. Stacking unpadded covers under shipping weight is the most common cause of bulk order damage.
For organizations ordering custom covers in quantity, provide your vendor with a physical sample of the certificate along with your digital artwork files. This eliminates sizing ambiguity and gives the production team a reference point for fit verification before the full run begins. Wehonoru’s made-to-fit custom sizing capability is specifically designed for situations where standard dimensions do not match the actual document, including non-standard trade school certificates, military commendations, and oversized university diplomas.
What tools and resources simplify custom certificate cover design?
Designing a certificate cover does not require a professional graphic designer, but it does require the right tools and file formats to produce print-ready artwork.
Design platforms and templates
Canva offers editable certificate cover templates that allow users without design experience to produce clean, professional layouts using drag-and-drop tools. Canva’s template library includes options sized for standard 8.5 x 11 and 6 x 8 documents, and the platform exports files in PDF format suitable for most printing vendors. For organizations with existing brand guidelines, Adobe Illustrator and Adobe InDesign provide the precision control needed to match exact Pantone colors and maintain vector artwork integrity.
File format requirements for print-ready artwork
| File Format | Use Case | Vendor Compatibility |
|---|---|---|
| .AI (Adobe Illustrator) | Vector logos and full cover layouts | Preferred by most professional vendors |
| .EPS | Vector artwork for logos and seals | Widely accepted; compatible with older systems |
| .PDF (print-ready) | Final layout with embedded fonts and images | Universal; preferred for final submission |
| .PNG / .JPG | Reference images only | Not suitable for imprinting; raster format |
Exporting artwork in vector formats such as .AI, .EPS, or print-ready .PDF preserves line sharpness at any scale and prevents the resolution degradation that causes blurred imprints. When submitting artwork to a vendor, always embed fonts or convert text to outlines to prevent font substitution errors on the vendor’s system.
Collaboration with printing vendors
- Share a physical sample of the certificate along with digital files
- Request a digital proof and, when possible, a physical strike-off before approving production
- Confirm minimum line weight and text size requirements specific to the chosen imprint method
- Ask whether the vendor accepts Pantone color specifications for cover material matching
- Clarify turnaround time, revision policy, and file format requirements before submitting final artwork
For organizations adding verification elements, QR codes and certificate IDs can be incorporated into the cover design as a small printed panel or as part of an interior pocket insert. This approach is increasingly common in healthcare credentialing and corporate training programs where third-party verification of certifications is a routine requirement. You can explore the full range of custom certificate cover options to understand how these features are applied in practice across different industries.
Key takeaways
Designing a professional certificate cover requires precise sizing, brand-aligned artwork in vector format, and an imprint method matched to the organization’s identity and budget.
| Point | Details |
|---|---|
| Size with clearance | Order covers 1/8 to 1/4 inch larger than the certificate to prevent edge damage and ensure a flat fit. |
| Use vector artwork | Submit logos and text in .AI, .EPS, or print-ready .PDF to guarantee sharp, clean imprints. |
| Match imprint to identity | Choose foil stamping for traditional prestige or debossing for a modern, minimalist finish. |
| Prioritize padding for protection | Padded covers protect documents 95% better than paper folders, making them the right choice for mailed or stored certificates. |
| Confirm before bulk ordering | Always request a physical sample proof before approving a full production run to verify fit, imprint quality, and material finish. |
Why simplicity is the most underrated design principle in certificate covers
Most organizations I work with arrive with the same instinct: they want to put everything on the cover. The full institutional seal, the program name, the year, a decorative border, and sometimes a motivational phrase. The result is a cover that reads as cluttered rather than distinguished, and one that almost always produces a poor imprint because the artwork is too intricate for foil stamping or embossing to reproduce cleanly.
The covers that consistently earn the strongest response from recipients are the ones that commit to restraint. A single centered logo in gold foil on a deep navy leatherette cover communicates more authority than a cover packed with competing elements. The white space around that logo is doing real work. It signals confidence. It says the institution does not need to explain itself.
Material choice is where I see the second most common miscalculation. Organizations frequently default to vinyl because it is the most affordable option, without considering that the cover will be handled repeatedly at a ceremony, photographed, and potentially displayed for years. Leatherette costs modestly more per unit but holds its finish through handling in a way that vinyl simply does not. For any cover that will be presented publicly or kept as a keepsake, the material upgrade is worth the investment.
My practical recommendation for any organization designing covers for the first time: start with the simplest version of your logo, select one foil color that aligns with your brand palette, and order a single sample before committing to quantity. The sample step is not optional. It is the only reliable way to verify that the imprint, the fit, and the material finish meet your standards before you are holding 500 units that cannot be returned. You can also review the diploma cover guide for a deeper look at how material and customization decisions interact across different document types.
— Manager
Professionally designed certificate covers from Wehonoru
Wehonoru produces premium tent-style diploma covers and high school diploma covers with metallic foil printing, available in multiple colors with no minimum order quantity and a one-business-day production turnaround. Each cover is constructed with durable materials and designed to protect documents through ceremony handling, shipping, and long-term storage. Custom logo and text imprinting is available for institutions and organizations that require branded presentation. Orders over $30 ship free, and made-to-fit sizing is available for non-standard document dimensions. Visit Wehonoru to view the full product catalog and configure a cover that matches your specific certificate size and branding requirements.
FAQ
What is the standard size for a certificate cover?
The most common certificate cover size is 8.5 x 11 inches for standard documents, with the cover itself cut 1/8 to 1/4 inch larger to allow the certificate to lay flat and prevent edge damage.
What file format should I submit for custom imprinting?
Submit artwork in .AI, .EPS, or print-ready .PDF format. These vector formats preserve line sharpness at any scale and prevent the blurring that occurs when raster files like JPEGs are used for foil stamping or embossing.
What is the difference between foil stamping and embossing on a certificate cover?
Foil stamping applies a metallic layer in gold, silver, or custom colors to the cover surface, adding a traditional prestigious shine. Embossing creates a raised design with no added color, producing a tactile, minimalist effect favored by modern organizations.
How do I choose between a tent-style and book-style cover?
Choose a tent-style cover for portrait-oriented certificates that are taller than wide, as this style opens upward and holds the document correctly. Choose a book-style cover for landscape-oriented certificates that are wider than tall, as this style opens to the side like a book.
Do padded certificate covers make a meaningful difference in document protection?
Padded covers protect documents significantly better than paper folders, reducing damage from bends, corner dings, and pressure during shipping and storage. For certificates that will be mailed or stored before presentation, padding is the recommended specification.