Custom Sizing for Document Covers: A Complete Guide

TL;DR:
- Custom sizing for document covers involves ordering precisely measured covers to fit non-standard certificates or diplomas exactly, ensuring a professional presentation. Accurate measurement of document dimensions, spine width, and structural features is essential, and suppliers should be communicated with in writing, including detailed specifications and features like window cut-outs. Using appropriate materials and collaborating closely with suppliers, along with proper file preparation, guarantees the final products fit perfectly and enhance the document’s value.
Custom sizing for document covers is the process of ordering or designing covers made to precise measurements that match non-standard certificate or diploma dimensions exactly. The industry term for this practice is “made-to-measure” or “made-to-fit” cover production, and it applies whenever a standard 8.5" x 11" or letter-size template fails to accommodate your specific document. Schools presenting oversized achievement certificates, universities issuing landscape-format diplomas, and corporate HR departments distributing custom-dimension award documents all face the same challenge: a cover that does not fit the document it is meant to protect undermines the entire presentation. This guide covers how to measure accurately, which materials perform best, how production workflows are affected, and how to communicate your specifications to suppliers so the final product honors the achievement it holds.
What is custom sizing for document covers?
Custom sizing for document covers means specifying exact height, width, and spine width dimensions rather than selecting from a supplier’s preset size catalog. This matters because certificates and diplomas are not standardized across institutions. A community college may issue an 8" x 10" diploma while a state university uses a 9" x 12" format, and a professional licensing board may produce an 11" x 14" certificate. Each of those documents requires a different cover, and ordering the wrong size creates a loose, sloppy presentation that diminishes the document’s perceived value. The sizing guide from Wehonoru confirms that schools and universities routinely specify exact dimensions when ordering covers for non-standard documents. Getting the size right is the single most important decision in the ordering process, and it begins with understanding what measurements you actually need to provide.

How to measure and specify custom cover dimensions accurately
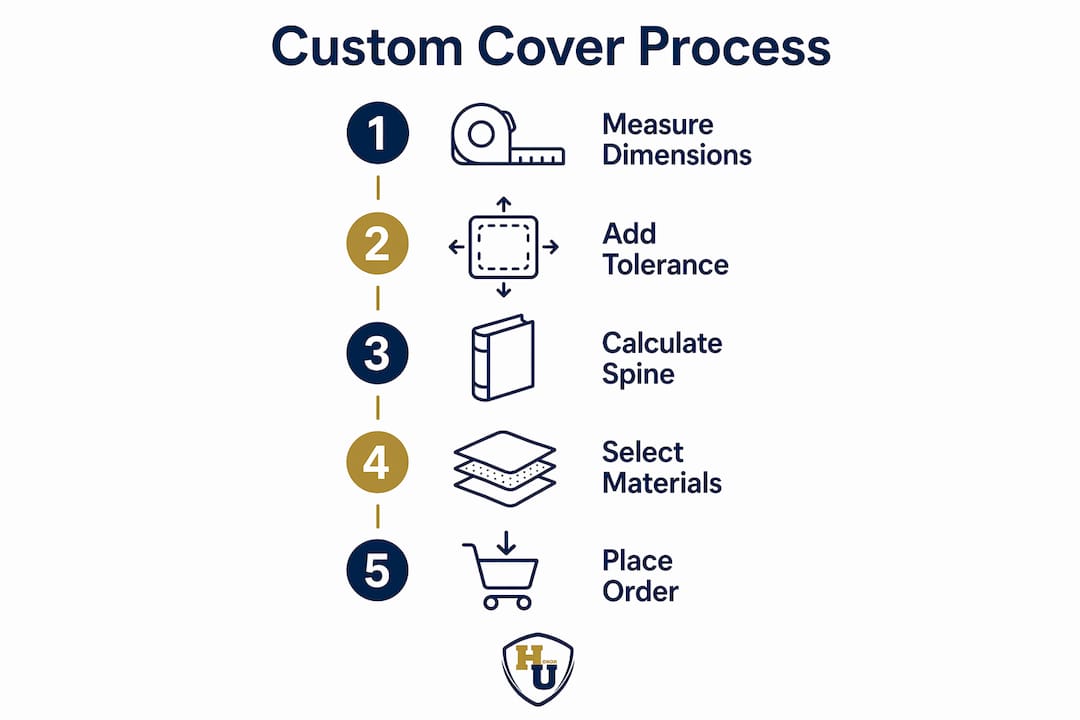
Accurate measurement is the foundation of a well-fitting cover. Follow these steps to gather every dimension a supplier will need before you place an order.
-
Measure the document height and width. Lay the certificate or diploma flat and measure from edge to edge in both directions. Record measurements in inches to two decimal places. A document that measures 8.75" x 11.25" is not a standard letter size, and treating it as one will result in a cover that either buckles or leaves exposed edges.
-
Account for any inserts or backing boards. Many presentation covers include a rigid backing panel or a decorative insert. Measure the combined thickness of the document plus any inserts, because this total thickness determines spine width for bound or folded covers.
-
Calculate spine width based on actual thickness. Thermal binding covers range from 1.5mm to 50mm in spine width to accommodate documents from a single sheet to thick bound volumes. Selecting the correct spine width based on actual document thickness, including any inserts or heavy paper, rather than just page count, ensures proper binding tightness and prevents the cover from appearing loose or compressed. Spine width is a mechanical necessity, not an aesthetic choice.
-
Specify bleed and safe zones. Any printed artwork on the cover needs a bleed margin, typically 0.125" beyond the trim line, and a safe zone that keeps critical design elements at least 0.25" inside the trim line. Cover files can be rejected for incorrect measurements by fractions of an inch, which means a single miscalculation can delay your entire order.
-
Note any window cut-outs or punch requirements. Some covers include a die-cut window that allows the document’s title or recipient name to show through the front panel. If your design requires this feature, measure the window opening precisely and include those dimensions in your order specifications.
-
Request a supplier dieline or template. A dieline is a flat, unfolded diagram of the cover showing all cut lines, fold lines, and bleed boundaries. Requesting supplier dielines that include bleed and safe zones ensures your artwork fits precisely after trimming, preventing white edges or cropped content.
Pro Tip: Add 1/16" of tolerance to your measured document dimensions when specifying cover interior dimensions. This small margin allows the document to slide in and out cleanly without the cover feeling loose.
The most common measurement error is recording the document size and assuming the cover interior matches it exactly. A cover’s interior pocket is always slightly larger than the document it holds, and a bound cover’s exterior is larger still once the spine and panels are accounted for. Communicate both the document size and the desired fit (snug versus easy-slide) to your supplier in writing.
What customization options and materials are available for tailored covers?
The material you choose for a custom cover determines its durability, appearance, and suitability for the presentation environment. The following options represent the most widely used materials in professional document cover production.
- PVC and polypropylene: Tear-resistant, waterproof, and available in clear or frosted finishes. PVC covers are ideal for certificates that will be handled frequently or displayed in high-humidity environments. Custom covers made with waterproof and weather-resistant materials protect documents during handling and outdoor presentations.
- Leather-grain paper and textured cardstock: These materials provide a premium, heirloom feel appropriate for diplomas, professional licenses, and formal awards. They accept metallic foil printing exceptionally well, which adds prestige to institutional branding.
- Heavy smooth cardstock (80 lb to 130 lb cover weight): A cost-effective option for high-volume certificate programs. It holds printed color accurately and folds cleanly along scored lines.
- Fabric and soft-touch laminates: Used for covers that need to withstand repeated handling, shipping, or outdoor events. These materials resist scuffing and maintain their appearance over time.
The table below compares the most common cover materials across the criteria that matter most for certificate and diploma presentations.
| Material | Durability | Print quality | Best use case | Relative cost |
|---|---|---|---|---|
| PVC / polypropylene | Very high | Moderate | High-humidity, frequent handling | Low to moderate |
| Leather-grain paper | Moderate | Excellent (foil) | Formal diplomas, professional licenses | Moderate to high |
| Heavy smooth cardstock | Moderate | Excellent (digital) | High-volume certificate programs | Low |
| Fabric / soft-touch laminate | High | Good | Outdoor events, repeated handling | Moderate to high |
Beyond material selection, structural customization options include:
- Window cut-outs: A die-cut opening in the front panel that frames the recipient’s name or document title. Specifying window cut-outs during ordering avoids receiving covers that fit dimensionally but fail functionally for display.
- Punched binding holes: Pre-punched holes allow covers to be inserted into ring binders or presentation portfolios. Suppliers like MyBinding offer custom cut sizes with punching options for personalized certificate display.
- Corner treatment: Rounded corners project a polished, modern appearance and reduce wear at the edges. Square corners are traditional and suit formal institutional presentations.
- Foil printing and embossing: Metallic foil in gold, silver, or custom colors adds a layer of prestige that printed ink alone cannot replicate. Wehonoru specializes in this finish across its full product line.
How does custom sizing affect printing and production workflows?
Custom cover dimensions introduce production variables that standard-size orders do not face. Understanding these variables helps you prepare files correctly and avoid costly reprints.
Print production tolerances are unforgiving. Artwork files prepared at 300 DPI with full bleed and safe zones aligned to the supplier’s official template reduce the risk of rejection significantly. When you deviate from a standard size, the supplier cannot rely on a pre-built template, which means your file setup becomes the single source of truth for the production team. Any error in your file translates directly into a miscut or misaligned cover.
Pro Tip: Export your final document as a PDF before calculating spine width. The exported file’s page count and paper weight together determine the precise spine measurement your supplier needs. Estimating from a draft version can result in a spine that is too tight or too loose.
Several additional production factors deserve attention when ordering custom covers:
- Paper thickness affects spine width calculation. A document printed on 28 lb bond paper has a different thickness than the same page count on 32 lb or 60 lb text stock. Always measure the actual finished document rather than calculating from paper weight tables.
- Digital printing equipment has physical size limits. Most commercial digital presses handle sheets up to 13" x 19". A cover that unfolds to a larger flat size may require offset printing or a specialized large-format press, which affects both lead time and cost.
- Foil stamping requires a custom die for non-standard sizes. If your cover includes metallic foil branding, the foil die must be sized to match your cover’s panel dimensions. Confirm with your supplier whether a new die is required and whether that cost is included in the quote.
- Binding type compatibility varies by cover size. Thermal binding, saddle stitching, and perfect binding each have dimensional constraints. A cover designed for thermal binding must match the spine width band of the thermal binding machine being used.
Communicating your spine width and document thickness in writing, rather than verbally, protects both you and the supplier. A written specification creates a reference point if the finished product does not match expectations, and it forces both parties to confirm the numbers before production begins. Preparing your art files for print with proper bleed, safe zones, and resolution is the single most effective way to prevent production delays on custom-size orders.
Best practices for working with custom cover suppliers
Effective supplier communication is what separates a smooth custom order from a frustrating one. These steps apply whether you are ordering a single cover for a personal graduation or 500 covers for a university commencement ceremony.
-
Submit dimensions in writing before requesting a quote. Provide document height, width, and thickness, plus any special features like window cut-outs or punch patterns. A written specification prevents miscommunication and gives the supplier everything needed to price the job accurately.
-
Request a physical sample or digital proof before full production. A proof reveals fit, color accuracy, and structural issues before you commit to a full run. For orders with window cut-outs or foil printing, a physical sample is particularly important because digital proofs cannot fully represent tactile finishes.
-
Confirm minimum order quantities and lead times upfront. Some suppliers require minimum quantities of 100 units for custom-cut sizes. Wehonoru operates with no minimum order quantity, which makes it practical for small institutions, individual graduates, and organizations testing a new cover design before scaling up.
-
Ask about material compatibility with your document type. A PVC cover that works well for a laser-printed certificate may not be appropriate for a document with embossed seals or raised lettering. Confirm that the cover material will not damage or distort the document over time.
-
Clarify the revision process before production begins. Ask your supplier how adjustments are handled if the proof does not match your specifications. Understand whether revisions incur additional charges and what the turnaround time is for a corrected proof. A supplier with a clear revision policy protects your investment and your timeline.
The complete guide to diploma cover selection from Wehonoru notes that material choices like waterproof or tear-resistant fabrics are particularly relevant for educational settings where covers may be handled by multiple people before reaching the recipient. Specifying the right material during the initial order conversation, rather than after the fact, saves both time and cost.
Key takeaways
Precise custom sizing for document covers requires accurate measurement of document dimensions, spine width, and structural features before any order is placed.
| Point | Details |
|---|---|
| Measure everything, including inserts | Record document height, width, and total thickness with any backing boards before specifying dimensions. |
| Spine width is a mechanical requirement | Match spine width to actual document thickness to prevent loose or compressed binding. |
| File setup determines print success | Prepare artwork at 300 DPI with full bleed and safe zones aligned to the supplier’s official dieline. |
| Specify structural features upfront | Declare window cut-outs and punch requirements at ordering to avoid covers that fit but fail functionally. |
| Confirm supplier terms before production | Verify minimum quantities, lead times, and revision policies in writing before approving any proof. |
Why precise sizing is the detail most organizations get wrong
After working with institutions and individuals ordering custom covers for years, the pattern I see most often is this: the document dimensions are measured correctly, and then the cover is ordered as if those two numbers are the only ones that matter. They are not. The spine width, the bleed margin, the window cut-out placement, and the material’s interaction with the document’s finish all contribute to whether the final product looks like a professional presentation or an afterthought.
The most avoidable mistake I encounter is ordering covers based on a document’s nominal size rather than its actual measured size. A “letter-size” certificate printed on a commercial press may measure 8.45" x 10.95" after trimming. Order a cover built for exactly 8.5" x 11" and you will have a cover that fits loosely and shifts inside the pocket. That small gap is visible to everyone in the room during a ceremony, and it communicates carelessness at precisely the moment when the institution or organization wants to project pride and quality.
The second most common mistake is treating the supplier conversation as a transaction rather than a collaboration. The best outcomes I have seen come from organizations that send a physical sample of their document to the supplier before finalizing the order. That sample allows the supplier to verify fit, test material compatibility, and confirm that any foil or window features align correctly. It adds a few days to the process, but it eliminates the risk of receiving 200 covers that do not fit the 200 diplomas waiting to be presented at commencement.
My practical advice is to build a sizing checklist specific to your document and keep it on file. Every time you reorder covers, pull that checklist, re-measure a current document sample, and confirm that nothing has changed in your printing process. Paper stock changes, print vendors change, and document dimensions can shift slightly as a result. A checklist takes five minutes to complete and can prevent a production error that takes five days to correct.
— Manager
Presentation-ready covers sized exactly for your document
When your certificate or diploma does not fit a standard template, Wehonoru’s made-to-fit cover production fills the gap. Every cover ships within one business day, with no minimum order quantity and no setup fees, so whether you need one cover for a personal milestone or hundreds for a commencement ceremony, the process is the same.
Wehonoru’s tent-style graduation document covers are available with custom dimensions, metallic foil branding in multiple colors, and material options suited to both formal presentations and high-volume institutional events. The high school diploma tent-style cover is also available in tailored sizing for non-standard diploma formats. Upload your logo, specify your dimensions, and receive a production-ready cover that fits the document and honors the achievement it represents.
FAQ
What dimensions do I need to provide for a custom cover order?
Provide the document’s height, width, and total thickness including any inserts or backing boards. Also specify any structural requirements such as window cut-outs, binding punch patterns, or spine width for bound covers.
How do I calculate spine width for a custom document cover?
Spine width is determined by the actual measured thickness of the finished document, including all inserts and paper stock. Thermal binding covers range from 1.5mm to 50mm to accommodate this range, so measure the physical document rather than estimating from page count.
Why do custom cover files get rejected by print suppliers?
Cover files are rejected for incorrect measurements by fractions of an inch when bleed margins or safe zones are missing or misaligned. Preparing artwork at 300 DPI using the supplier’s official dieline template prevents the most common rejection causes.
Can I order a single custom-sized cover, or is there a minimum quantity?
Wehonoru accepts orders with no minimum quantity, including single-unit orders for individual graduates or one-time award presentations. Many other suppliers require minimums of 25 to 100 units for custom-cut sizes.
What is the difference between a window cut-out and a standard cover front panel?
A window cut-out is a die-cut opening in the cover’s front panel that frames a specific portion of the document, such as the recipient’s name or a seal. A standard front panel is solid. Specifying window cut-outs at the time of ordering is necessary to avoid receiving covers that fit the document’s dimensions but do not display it correctly.
Recommended
- Custom Size Certificate Cover: Definition and Sizing Guide | Honor U
- Customized Diploma Cover: Your Complete Ordering Guide | Honor U
- Cover for Diploma: Complete Guide to Choosing and Customizing Diploma Covers | Honor U
- The Perfect Fit: Understanding Document Cover Sizes & Why Yours Might Be Unique | Honor U